How To Reinstate the Freezer Drawer in Your GE Refrigerator with Ease
A well-functioning freezer is essential for preserving your frozen foods efficiently, but sometimes, we find ourselves with the dreaded situation of a dislodged freezer drawer. Whether the drawer was removed for cleaning or accidentally came off its track, knowing how to put it back in place can save you time, frustration, and money. Here, we explore the process of reinserting a freezer drawer into a GE refrigerator, equipping you with all the tips and guidance necessary for a smooth experience.
Getting to Know Your GE Refrigerator
GE refrigerators are known for their reliability and modern features, yet freezer drawers can sometimes come off their tracks due to regular use. Understanding the basic structure of your fridge can make a world of difference when it comes to maintenance and quick fixes.
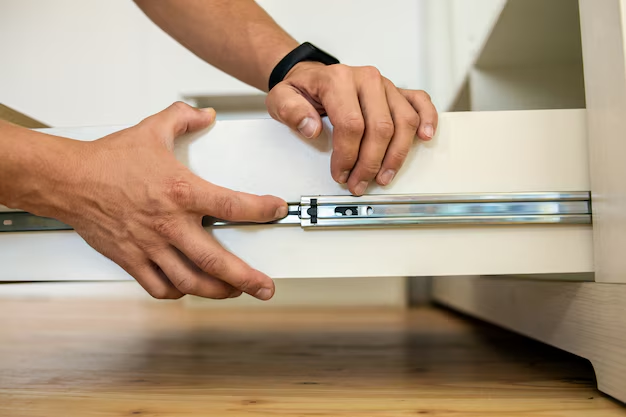
Key Components of a Freezer Drawer
- Drawer Basket: The large, bottom component typically holds the bulk of the frozen goods.
- Drawer Front: The front panel that you pull on to open the freezer drawer.
- Rails and Tracks: The mechanisms on which the drawer slides in and out.
- Sliding Mechanism: Some GE fridge models use rollers or glides for smoother operation.
Understanding these parts will assist in troubleshooting and repairing your freezer drawer issues, ensuring seamless reinsertion.
Step-by-Step Guide to Reinstall the Freezer Drawer
Before diving into the reinstall process, ensure safety by unplugging the refrigerator or turning off the power at the circuit breaker. This precaution protects you from any potential electrical hazards.
Step 1: Inspect the Components
A thorough inspection of the components before you start will ensure a smoother reassembly process.
- Check the Rails: Ensure that the rails or tracks inside the freezer are clean and undamaged.
- Assess the Drawer Basket: Look for any cracks or damage that might impede reinstalling.
- Examine the Sliding Mechanism: Ensure it moves freely and smoothly without resistance.
Step 2: Align the Drawer
Alignment is critical when reinserting the drawer. You'll need to align both sides of the drawer onto their respective tracks within the freezer.
- Position the Basket: Hold the drawer basket at a slight angle, aligning it with the starting point of each track.
- Slide Into Place: Gently slide the basket forward until you feel it catch on the tracks.
Step 3: Engage the Sliding Mechanism
Some models may require you to activate a locking mechanism.
- Secure the Drawer: Push the drawer fully in to engage any locking mechanisms. Some GE models may produce a clicking sound once locked.
Quick Tips for Smooth Operation
- Lubrication: If the drawer glides are stiff, consider lightly lubricating the metal tracks with a suitable product.
- Weight Distribution: Ensure items are distributed evenly within the drawer to prevent additional strain.
- Routine Maintenance: Regular cleaning and maintenance of the drawer tracks can prevent future dislodgment and ensure a smooth glide.
Troubleshooting Common Issues
Even with the best efforts, sometimes the drawer might not behave as expected. Let’s explore some common setbacks and how to overcome them.
Drawer Does Not Align
- Verify the drawer and track components are clean and free from obstructions.
- Ensure both sides of the drawer are evenly engaged with their respective tracks.
Drawer Stuck or Not Moving
- Inspect the sliding mechanism for any visible obstructions.
- Confirm that no additional items are impeding movement from under or behind the drawer.
Drawer Making Noise
- Identify and remove any potential items that could be rattling within the drawer.
- Lubricate the tracks lightly to ensure they allow a noiseless slide.
Related Maintenance Tips
Keeping your freezer in prime condition extends the life of your appliance and enhances functionality. Here are a few related maintenance tips:
Regular Cleaning
- Monthly Checks: Schedule monthly inspections to remove any debris that may have accumulated.
- Deep Cleaning: Bi-annual deep cleaning ensures the drawer and freezer components are at optimal cleanliness, preventing mold buildup.
Temperature Regulation
- Monitor Settings: Regularly check that your freezer settings align with the manufacturer's recommendations.
- Avoid Overfilling: Ensure there is enough space for air to circulate within the freezer to maintain the desired temperature.
Periodic Inspection
- Hardware Checks: Inspect bolts, screws, and any hardware within the freezer compartment to ensure they are secure.
- Seal Examination: Check the gasket for any tears or wear that might affect the efficiency of the seal.
Visual Summary: Key Takeaways for Drawer Management
🗂️ Checklist for Freezer Drawer Reinsertion:
- Inspect Components: Confirm all parts are clean and undamaged before reinserting.
- Align Properly: Ensure the drawer aligns with the tracks on both sides for an accurate fit.
- Engage Mechanism: Push the drawer until it clicks into place or secures via a locking mechanism.
- Routine Maintenance: Implement a regular schedule for cleaning and inspection.
Maintaining a functional freezer drawer can significantly enhance your daily kitchen experience by ensuring easy access and efficient storage of frozen goods. Taking preventative measures, performing regular maintenance, and knowing how to address common pitfalls promote the longevity and reliability of your GE refrigerator.
By the end of this guide, you should feel more confident in managing not only the freezer drawer but also understanding the importance of regular maintenance and care in keeping your GE appliance running smoothly. Now, you’re equipped with the know-how to reinstate the drawer with ease and tackle any potential setbacks with confidence.